PortraitMate is a tool to help you accurately draw from photos on your mobile device. One of the most important things when you’re drawing a portrait is to get the proportions of the facial features right. Using the triangulation method, you map out key points relative to each other. Using PortraitMate, you will easily be able to see the angles of the lines connecting these points and reproduce them in your sketch.
Depending on your own preferences, you can use a protractor to increase your accuracy and get the angles of these lines spot on. Alternatively, if you prefer your sketch to be even more freehand, you can use the guidelines on the app to gauge the location of features relative to each other.
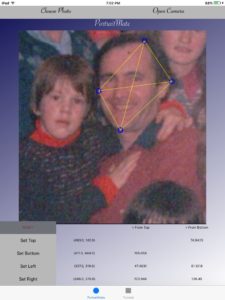
Step 2. Set your four most extreme points - top, bottom, left and right - by touching the image followed by the corresponding 'set point' button. Repeat until all four points are set. You will then see the angles between both the top and bottom points and the other three points.
The top and bottom points are the two main anchor points. These are the points from which you will draw lines to the left and right points, which you can then use as guidelines to accurately sketch your subject.
Step 3. Start your drawing by lightly drawing two horizontal lines. These lines correspond to the top and bottom points of your sketch, and so the distance between them will dictate the scale of your finished picture. You'll need to keep that in mind when deciding on the space between the two lines.
Step 4. Select a point along the top horizontal line that we will use to correspond to thetop point in your drawing. Using a protractor, draw lines from this point at the angles given by PortraitMate from the Top to the other three points. Where the line from the top to the bottom intersects the bottom horizontal line will be your Bottom point.
Step 5. Draw lines from the Bottom point at the angles indicated by PortraitMate between the Bottom and Left and Right points. Where these lines meet the lines drawn from the Top point should correspond to the selected points on the original image. You can use these points as guide points to ensure that your porportions are correct in your sketch.
If required you can reset the Left and Right points and repeat the process to get additional guide points.


